
FAQ#
See also: the Raspberry Shake Forum where you can easily search the archives for questions similar to your own.
Contents
Installation#
Anchoring: How do I anchor my Raspberry Shake to the floor?#
Question: The Shake box seems to come with some nice trim screws to set it level. How though is the unit meant to be coupled to the ground/concrete/slab/table…? The last few earthquakes I’ve experienced here in New Zealand would of sent the Raspberry Shake bouncing off the table or sliding over floor which means it will not actually be recording what it is meant to? How is it proposed to couple it to the horizontal surface?
Answer: Shake does not need to be “anchored”.
Raspberry Shake is a weak motion device, like most seismometers are. It is designed to measure sub-micron movements. It probably completely clips between 0.1 and 0.2 g.
If during an earthquake objects are in the air then surely 1 g has been exceeded. Just yesterday I was watching youTube videos of the last New Zealand earthquake and yes things were moving. Shake and any other seismometer would be totally saturated and the data would be useless even if they were anchored.
Seismologists use accelerometers which have a range above 1 g commonly set to 2 g and can be set to 4 g. These devices are anchored. In a Class A seismic installation you would have a seismometer, and accelerometer that goes to DC and a GPS. This would allow for the huge dynamic range that you will get in a large earthquake. The accelerometer to DC and the GPS would allow you to see the displacements that a velocity sensor like the Shake will not show.
How precisely does Raspberry Shake need to be leveled?#
Answer: This is a good question and one that is tossed around here at Raspberry Shake. Geophones are made by lots of companies and in lots of natural frequencies and cases and coil types. We think that the geophone used in Raspberry shake will have over 95% of it output out to about three degrees. A quick and dirty test of the undamped output of the Raspberry Shake’s 4.5 Hz geophone was performed. We did the test at 10 Hz to get away from the amplification of the resonant frequency. We moved the geophone 1 mm. 1mm at 10Hz is strong shaking. From 0 to 3 degrees of tilt we could not see any significant difference in the output. It was not until 6 degrees that we could see a change and not until 15 degrees that the output was meaningless.
We can definitely say that if the leveling bubble is mostly within the little circle on the level built into the acrylic box, that things are ok. From the test we have done, I think that the leveling bubble we provide will achieve the +/- .5 Degrees as long as the leveling bubble is centered in the circle.
Later, one of our backers, Brett, responded: “I did a quick test to check the leveling bubble sensitivity. It took about one turn of the leg screw located on the center line to move the leveling bubble from centered to be solidly touching the black ring. That’s 0.8mm over 123.5mm, the perpendicular distance from that screw to a line between the other two legs. That ratio is 0.00648 and taking the ArcSin = 0.37 deg. of tilt, which is slightly better than you suggest. Probably the biggest factor will be how well the geophone guts are aligned with the leveling bubble. Super leveling is not going to be an issue.”
Why does my Raspberry Shake change IP?#
IP addresses can either be “DHCP”, that is “D”ynamically assigned, or “Static”. Most routers today dynamically assign IP addresses. That means that every time a computer like the Raspberry Pi is connected it is given an IP address. It can be the same IP address as previously assigned or a new one. The connection is time limited. Some routers set it to a day or so, some months and still others many years. So, depending on the router settings, the connection will be released and reconnected after a certain time window. On some routers it is possible to change length of the time, on others not. For example at a university where many people come and go, the time window is set to shorter time so that the IP address can be recycled. At home where you have fewer computers, you would obviously prefer a longer time window. The solution around this problem is to set a Static IP address. See here for instructions: Static IP
Why does my Raspberry Shake change its DNS name?#
Question: When I start Shake #1, it takes the DNS name rs.local/. Then, when I start Shake #2, it takes over the DNS name rs.local/ and kicks Shake #1 to rs-2.local. What is happening and how can I stop it?
Answer: This is a complex one and can only happen on certain networks (generally, those that use small or medium business hardware). Let’s start by leaning about the two protocols that smart switches usually have. Then we can take a look at “what’s happening,” then finally how you can fix it.
Protocol 1: RSTP
RSTP makes sure there are no loops or ambiguities on the network. The switch will not forward any packet from a port that just came up until its tests are done. Here’s a good link that explains RSTP in full.
Protocol 2: Avahi/Bonjour
This protocol is responsible for searching for, assigning, and keeping track of DNS names on many modern networks.
Connection type 1: IPv4
The IPv4 link needs to negotiate with a DHCP server in order to get an address. This takes a short but significant amount of time.
Connection type 2: IPv6
The IPv6 link does not need negotiation of local-link addresses like IPv4 does. It just picks one of many millions of addresses and then can send packets right away.
What’s happening
Shake 1 is already booted and it has the hostname rs.local/.
When the first link on Shake 2 becomes ready, Avahi immediately sends a broadcast packet that says “hello! does anyone own rs.local/?” with any connection available. Since IPv6 is generally the first connection to become available, the Avahi request is sent via this connection. IPv4 is not ready at this point, since it is still negotiating its address with the DHCP server.
At this moment the switch (with RSTP turned on) is not forwarding packets to Shake 2 yet. It “checks” that everything is ok with network and that there are no ambiguities.
The result is that nobody sees the “hello” packets sent by Shake 2. So Shake 2 decides there is no rs.local/ on the network and announces its name (rs.local/) to the network. At that moment, the IPv4 link becomes ready (i.e. the switch now forwards packets from Shake 2). Shake 1 sees someone took its name and automatically assigns itself a new name rs-2.local.
How to fix it:
There are a few ways to potentially fix this issue:
By disabling IPv6. You can do this by editing the file
/etc/sysctl.conf:sudo nano /etc/sysctl.conf
add the following lines to the end of the file:
net.ipv6.conf.all.disable_ipv6=1
net.ipv6.conf.default.disable_ipv6=1
Then restart the Shake. The DNS name should now “stick” once assigned.
Manually change the DNS name. You can do this by editing the file
/etc/avahi/avahi-daemon.conf:sudo nano /etc/avahi/avahi-daemon.conf
Modify the following line and replace
rswith the DNS name of your choice. It should have no spaces or special characters except minus (-):host-name=rsThen restart the Shake. Your shake should now be visible at
nameyouchose.local. If you lose track of what you’ve named your Shake, you can Find your Raspberry Shake’s IP with Fing.
Disable RSTP on your switch. Since this is device-specific, we can’t help you. However, a google search for “Disable RSTP on [your device’s make and model]” may help.
What if rs.local/ does not open in my browser?#
If a search or an empty web page appears instead of the Shake configuration screen, remember to add a forward slash to the local address, like this:
rs.local/There is a possibility that your Shake is still completing the initial update process. The time varies depending on the internet connection speed, so try again in a little bit.
You can try to find the IP address of your Shake from your WiFi router admin panel, or with an app like Fing (more details here). Enter the IP into your browser, which will open the same
rs.local/config page.
How long does it take for my Shake to appear on ShakeNet?#
Usually, your new Shake will appear on the ShakeNet mobile and web apps in a matter of minutes. However, if your Shake is not displayed in 24h, then you can contact us on our community to receive technical support.
What if I have a restricted network (e.g., a firewall at schools or the office)?#
We recommend talking with your IT administrator to add your Shake’s MAC and/or IP address to their system. Also, some ports should be always open to allow data transmission from your Shake to our data servers. You can find a comprehensive list here.
How do I contribute to worldwide earthquake detection?#
Click on the Settings (gear) icon in
rs.local/.Select the DATA tab.
Once there, please check the “Forward Data” box.
Finally, click on the
Save and Restartbutton at the bottom of the page.
What is an ideal location for my new Raspberry Shake after the initial setup?#
The best location for your Shake is the “quietest” place possible. In some cases, this could be on a concrete slab of the lowest floor of your building, near a foundation wall, and away from washing machines, air conditioners, and similar “noisy” things. Also, a shed out in your yard or a corner in your garage would be good places.
The best ones are naturally quiet locations far away from people and traffic and with an internet connection. Some users want to optimize their Shake’s location as best as possible and choose to build their own DIY seismic vault. Regardless of where you set it up, your Shake will capture every vibration around you!
Hardware#
How does the Raspberry Shake compare to a broadband seismometer?#
See: How does the Raspberry Shake compare to a broadband seismometer?
What’s inside the geophone sensor?#
What is a hyper-damper?#
The hyper-damper is the analog circuit that Raspberry Shake has developed that extends the period of the geophone connected to the Shake board from its natural frequency of 4.5 Hz to ~2 seconds.
Is the schematic for the Raspberry Shake available?#
The schematic for Shake is not available. Much of the software is open. Our reason for not making the schematic available is that if we made the hardware open and the firmware that went with it, we would see Raspberry Shake on Alibaba before the Kickstarter campaign was even over.
We align ourselves in many ways with the folks at Pololu when they make this statement about open hardware: See article here. Pololu put a huge amount of work in writing that piece, long but worth the read.
What is the difference between the RS1D, RS3D and RS4D models?#
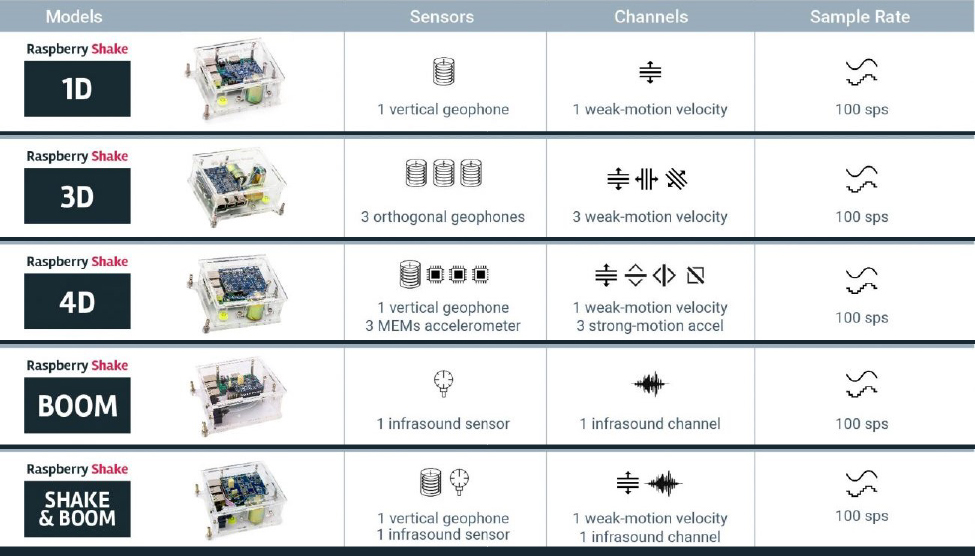
Click to enlarge#
sps = samples per second on all channels
The RS1D, RS3D, RS4D and RS&BOOM have the same capabilities for detecting Earth motion in the vertical dimension. The RS3D replicates these abilities in the horizontal dimensions, providing the user with a fuller view of Earth motion in all 3 dimensions. The difference between the RS1D and the RS4D is that the RS4D has a 3 dimensional accelerometer built into the board. This is interesting for people who live in earthquake zones where the strong motion might be enough to saturate the vertical sensor. With the accelerometer, the Earth motion would remain on scale with the added benefit of being able to detect lateral motion as well.
Why can’t I mount/ stack multiple Rasberry Shake boards on the same Raspberry Pi computer?#
This is because the RPi computer only has one serial port (Rx/ Tx) connection. See GPIO pins.
Is my Shake running too hot?#
The short answer: if it’s below about 75 ℃, probably not.
The CPU temperature can be monitored on the web front end. Depending on the case it’s installed in, the ventilation, and the ambient air temperature and humidity, the CPU will probably run anywhere from about 45 to 65 ℃. The RS3D, RS4D, and RJAM typically run hotter than the RS1D. Waterproof enclosures will be slightly hotter than the standard acryllic ones due to lack of air exchange.
If the CPU temperature goes above 80 ℃, the system will throttle the performance and you may notice data gaps and connection problems, possibly requiring a restart. It is a good idea to place the Shake in a relatively cool location without large temperature swings.
If you plan on mounting the Shake in a hot location, it may need some sort of passive cooling. Active cooling (fans) typically generate noise that may be undesirable for your use case. Generally, giving the Shake some breathing space and avoiding packing it in with insulation (unless it’s being installed in a very cold environment) is a good idea.
Is the GPS antenna connection IP67?#
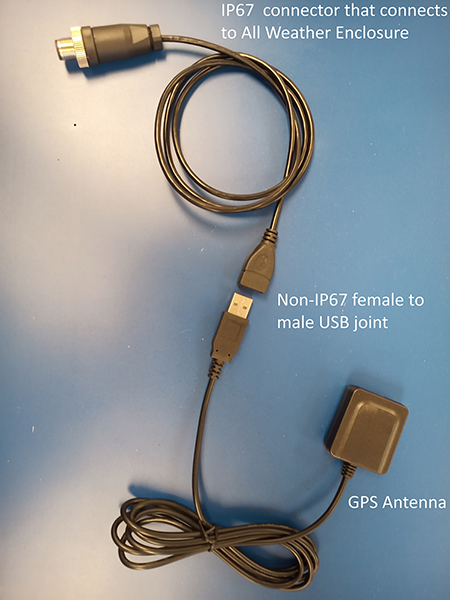
Click to enlarge#
Yes and No.
The Raspberry Shake itself is IP67, and also the GPS antenna. The place where the connect to one another is not IP67.
Why is that? For starters, removing the GPS antenna’s USB connector and joining the bare wires to an IP67 connector that would screw onto the IP67 “All weather” enclosure is non-trivial. That aside, the IP67 enclosure was designed to protect the more expensive Raspberry Shake itself from water damage inside of structures that might flood, and not to allow for outside or buried installations, though these are possible when the proper precautions are taken. In most cases, the Raspberry Shake will be installed indoors (or inside a seismic vault) where it is protected from the elements but might still be susceptible to flooding. In this scenario, the Raspberry Shake would most likely be installed on the ground. Therefore, the cable connections at the Raspberry Shake enclosure itself are IP67. This is the case with the USB cable that the antenna plugs into. The other end of the cable where the GPS antenna plugs into is not IP67. To reduce the risk of water damage to the non-IP67 end of the cable where the GPS antenna plugs into, the cable assembly should be mounted on a shelf or wall, well above the water line.
What can I do if I get a low power supply warning?#
Note
The Raspberry Shake requires a 5.0V to 5.2V DC power supply. It also requires at least 2.5A for Raspberry Pi 3B models, and 3.0A for the 4B models. For any USB charger, be sure it gives 2.5+ Amps and then test it when it comes as we have found that many manufacturers report 2.5 or 3 Amps but the equipment does not meet spec.
Note
We recommend using the official power supply to guarantee optimal working performance for your Raspberry Shake.
If the low power supply warning appears frequently, or is constantly on the rs.local/ screen, these are the steps you can take to troubleshoot the issue:
Shut down the Shake and change wall socket if the instrument is installed indoor, or check if the power cable/couplings are still intact if it is installed outdoor.
If you have another Pi power supply that you know is in working conition, being mindful of the requirements listed above, try to swap the current one on the Shake with this second supply.
If you don’t have it, consider acquiring it online from an official Raspberry Pi supplier.
If your Shake is an outdoor model, you can contact us on our community to see what options are available.
If all of the above does not fix the issue, please contact us on our community stating that you have already tried the previous options. Our Technical Support is always ready to help.
Can I plug my Shake into a monitor via HDMI?#
Your Shake does not utilize the HDMI output for data visualization or configuration. The Shake can be accessed via the rs.local/ webpage and the data can be visualized remotely through the ShakeNet mobile and web apps.
If you require, however, to enable the HDMI output, you can find instructions on how to do so here.
Can I connect my Shake to the Internet via Wi-Fi?#
We do not recommend using Wi-Fi with your Raspberry Shake, as it can significantly degrade seismic data quality. The internal Wi-Fi antenna on the Raspberry Pi sits very close to the Shake board and can introduce high amplitude radio-frequency noise, often visible as low-frequency spikes in the waveform.
If using Wi-Fi is your only way to connect, we strongly recommend the following:
Use an external USB Wi-Fi dongle instead of the Pi’s internal antenna.
Keep the dongle (and its antenna) as far from the Shake as possible. A standard-length USB dongle should be enough, but a shielded USB extension cable would be better.
As a reminder, Raspberry 3B boards only support 2.4 GHz networks. RPi 3B+ and 4 boards, instead, support dual band Wi-Fi, 2.4 GHz and 5 GHz.
For more information:
See Wi-Fi Recommendations for Raspberry Shake for general advice and acceptable use cases.
See Configuring Wi-Fi and USB Dongles for step-by-step setup and troubleshooting instructions.
Why might my Shake be constantly rebooting/ not turning on?#
We recommend that you check the output of your power supply. The Shake requires 5.0V to 5.2V DC and at least 2.5A for Raspberry Pi 3B models, and 3.0A for the 4B models. Note that your typical cell phone power supplies generally do not supply sufficient Amps.
Note
We recommend using the official power supply to guarantee optimal working performance for your Raspberry Shake.
Will my Shake work with any Raspberry Pi?#
See: Supported RPi Models
Attention - DIY builds
For DIY builds, we recommend the Raspberry Pi 3 Model B. If you opt for the Raspberry Pi 3 Model B+ or 4 Model B, you will likely need to clip the PoE header pins before mounting the Shake board, as they can prevent the hat from seating properly.
Can I use a geophone that I already have?#
Yes, as long as it is a 4.5 Hz geophone with a coil resistance of 380 ohms. Contact us on the community if you have any questions or want to double check that your geophone is compatible.
Software#
What is the username and password?#
Username: myshake
Default ssh password: shakeme
See also: How to change your ssh password.
Do I need a software license to use my Raspberry Shake?#
See our: License
Additional note: All Raspberry Shakes purchased during the Kickstarter campaign are exempt from the license requirement.
Should/ Can I update the Operating System?#
We do not recommend updating the Raspberry Pi’s OS The problem with updating the OS, without regard to the operating environment it supports, is that the possibility exists for the update to break some instance of infrastructure on which the executing system relies. It is possible that the Raspberry Shake unit will simply stop functioning and you won’t know why. Rather, it is preferred that the maintainer of the system fully understand the implications of any OS update on the system itself before allowing such an update to take place. Only once an OS update has been fully vetted (vs. all activities it is required to support) should it then be rolled out to individual units in the field. For more details see: Ready, Set, Get Hacked! Security and Raspberry Shake.
How do I report bugs?#
Please send an email to the Feedback section of the Community Forum list with the subject: “Bug Report (<Tool>): <some summary message here>”.
How do I download the logs from the Shake?#
Navigate to Raspberry Shake’s web configuration page by entering
rs.local/in your browser. Ifrs.local/is not accessible, please check What if rs.local/ does not open in my browser?.Click on the orange
Download Log Filesbutton at the bottom of the page.The logs will be automatically compiled and downloaded to your device.
How is the station name determined?#
How do I re-burn the Shake OS image on the microSD card?#
Where do I find the local Shake helicorder?#
You can access the onboard helicorder by going to this address rs.local/heli or <shakeIPaddress>/heli.
If you are looking for the actual image files, they are stored on the Shake at this location: /opt/data/gifs.
Is there a unique SD card image for each model of the Raspberry Shake?#
All models of Raspberry Shake, including the RS1D, RS3D, RS4D, RBOOM, RS&BOOM and RJAM use the same software.
Can others see my Shake’s exact location on ShakeNet?#
The short answer is no. For a more complete explanation, see below.
Why is my Shake location “wrong” by a couple hundred meters?#
In short: we intentionally obscure publicly-reported station locations on our public server for user privacy reasons.
The longer and more technical answer of why we can do this:
The obscured locations we expose to the public are not obscured enough to effect earthquake solutions, as seismic waves travel anywhere from 2-8 km/s near earth’s surface. Even the best global seismic velocity models are not great at incorporating regional velocity changes and therefore seismic wave arrival times can vary by many hundreds or thousands of milliseconds, especially for regional events where regional velocity can differ significantly from the global models. Seismology is a very imperfect science, and Earth is a very imperfect place to study seismic wave propagation because surface and crustal material velocities vary widely and we know so little about how they do. Depending on the geologic material (clay, sand, granite, basalt, etc) seismic waves can change speed very frequently, and they typically do so without our knowledge. Because of this, introducing a few hundred meters of randomly determined variation is a relatively small source of error on the earth-scale of things.
What is the data transfer rate of the Raspberry Shake?#
We’ve gotten this question a lot, and it can depend on what features you have enabled, and whether you are simply forwarding data, or also accessing the Shake via SWARM, FileZilla, or a Seedlink/Earthworm/Wave Server client.
Below, we show the calculations we use for figuring out the maximum and average data transfer rates for a Shake 4D (4 channels) as of version 15 of the software.
Max data / second:
= number of bytes for headers + number of bytes for data points

chn = total number of channels
dpf = data packet frequency, i.e., number of data packets / second
dph = data packet header size
sps = sample rate, as samples / second
bdp = max bytes / data point

= chn * dpf * dph + chn * sps * bdp
= 4 * 4 * 80 + 4 * 100 * 11
= 1280 + 4400
= 5680 bytes / second

Max data per day:
= 5680 * 86400
= 490752000 bytes
= 468 MB

Average data per day: (assuming 5 bytes / data point):
= 270MB / day / 100Hz 4D

Max data per month:
468 MB * 30 days = 14040 MB/mo

Average data per month:
270 MB * 30 days = 8100 MB/mo
These calculations are scalable to any of our instruments, depending on the number of channels. For example, for a 1D or Boom, divide these final numbers by 4 (2-3.5 GB/mo). For a 3D, multiply by 0.75 (6-10.5 GB/mo). For a Shake&Boom, divide by 2 (4-7 GB/mo).
As stated above, if the data transfer rates you calculate are higher than these, then there is some other process using data. Typically, there is no need to worry about data consumption unless you are on a cellular network that regulates the transfer of data. The Shake uses far less than, say, streaming video services. If you are worried about data usage however, check the logs for connections to the wave server and ensure that other running programs are turned off.
How much data can be stored on a Raspberry Shake?#
Another question that we often get is the maximum amount of days that can be recorded on a Shake. This value depends on two major factors: the capacity of the installed microSD card and the model of the Shake.
To obtain the maximum storage capacity (and other useful data) per instrument, per SD card size, a general formula can be applied:
1. TMD = Total Mb / Day / Channel = 15Mb
2. TMI = Total Mb / Day / Instrument = Total Instrument Channels * (TMD)
3. TSD = Total SD Card Mb Available for Data = SD Card Size (from "df -h") - 4Gb (System Files)
4. Max Total Days Data Can be Saved = (TSD) / (TMI)
5. Total Mb Overall Saved to Disk = Total Days Data Saved (configured by user) * (TMI)
So, using an RS4D as an example with a standard 8GB microSD card:
1. TMD = 15Mb
2. TMI = 15Mb * 4 = 60Mb
3. TSD = 7.1Gb ("df -h") - 4Gb = 3.1Gb
4. Max Days = 3.1Gb / 60Mb = 52 (rounding down)
5. Total Mb Saved = 51 * 60Mb = 3.06Gb
These calculations are naturally scalable to any of our instruments or different microSD card capacities. Just substitute the values of your system and you will obtain the related maximum storage value.