Physical Installation
The Sixaola can be pre-configured in the laboratory prior to installation. If configured in Darien Client Data Flow Mode, the Sixaola can be easily installed by an untrained technician (see: Data Flow Mode).
Click below to watch the Sixaola installation video.
Tools
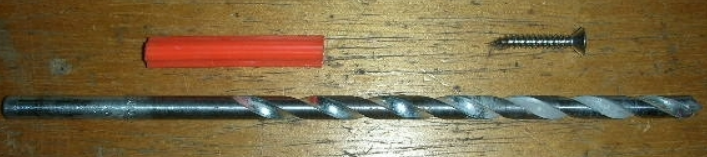
- Drill with a 5/16 masonary bit
- Hammer
- Screw driver #2 Phillips
- 2.5 mm hex driver or Allen wrench
- Compass
Site Selection
- Choose a site:
- Close to a power outlet
- Close to an Ethernet connection
- With as little human traffic as possible
- Optional: Less than 10 meters from a place with a clear view of the sky where you can install the GPS antenna.
Anchoring the Sixaola
Click here to watch the Sixaola installation video.
- Begin by positioning the Sixaola, orienting it roughly towards North and by making sure that the cables reach the power outlet and Ethernet connection.
- Drill a hole one inch deep into the floor using a 5/16 masonary drill bit.
- Using a hammer, pound the plastic screw anchor into the hole.
- Using a #2 phillips screw driver, guide the screw into the hole until the top of head is ~5 mm from the floor.
- Slide the Sixaola over the screw.
- Lower the 3 feet of the Sixaola to the floor until you meet resistance.
- Now orient and level the Sixaola.
- Tighten the hexagon nuts, connect the cables and you are done.
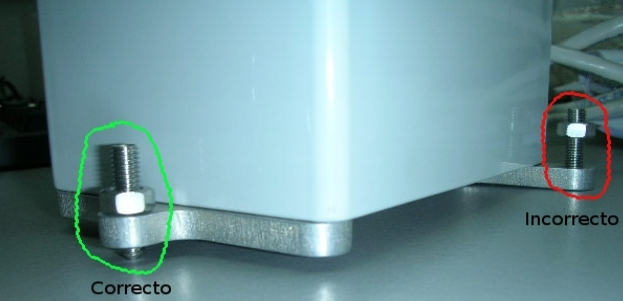
Remember to tighten the hexagon nuts
GPS Antenna
The GPS antenna should be oriented facing skyward with a clear view.
Note
As with any sensor that uses GPS, when installed at a new site the GPS may take over an hour to discover where it is and begin negotiating available satellites.
Orientation
The North arrow is printed on the green Sixaola card next to the bubble level and runs parallel to the side of the unit.
Leveling
A bubble level is attached to the green Sixaola card.
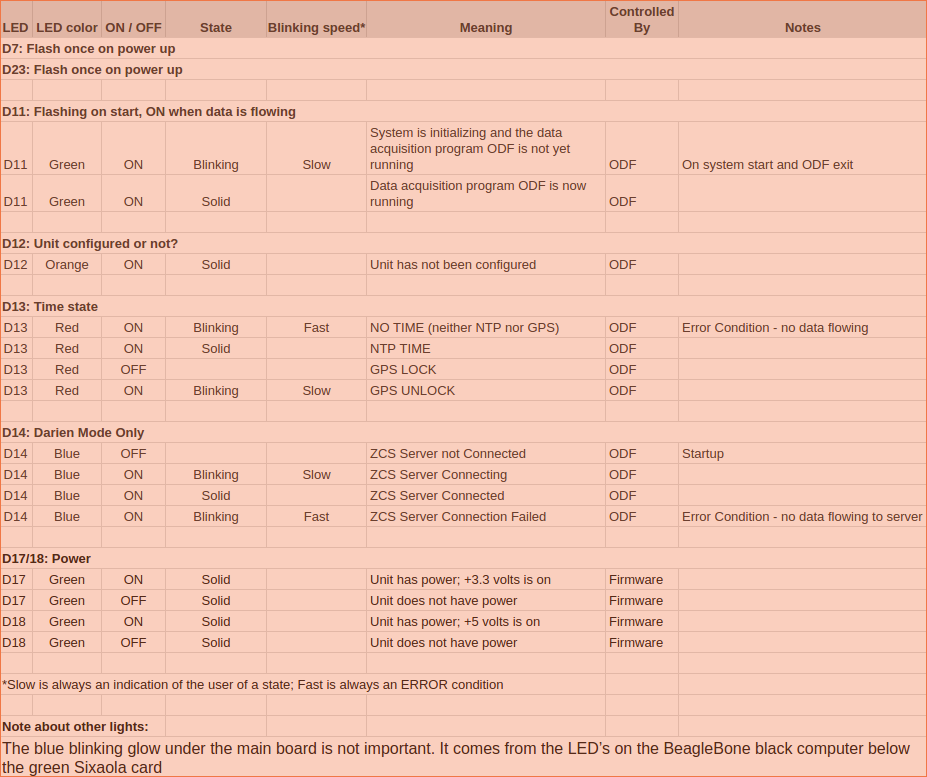
LEDs
Installation Check List
- Record the:
- Serial Number
- SCNL (for SeedLink Streamer, Data Logger and Event Loggers modes only)
- A brief description of the site
- Local contact information- Name, phone number, email
- Latitude, Longitude, Elevation
- Networking information: IP, tunnel client IP, tap, name and password
- Usernames and passwords for ssh and the web-interface
- SeedLink port (if using SeedLink Streamer mode)
- You might also consider taking photos of the site
We recommend that you use www.trello.com to organize and update your station metadata.
Oriented North
Level
Hexagon nuts tightened
Verify LEDS: See
here
Additional Recommendations
OSOP recommends pairing each Sixaola with a UPS to protect Ethernet ports and the Sixaola components from voltage spikes.
The ssh password for root (and/or debian) should be changed. Also consider using ssh-keys instead of passwords.