How to install your Raspberry Shake underground#
Contents
Example 1: shallow posthole installation#
Contributed by: Gerard @Australia
Some of our DIYer backers love to try new things- like installing their Raspberry Shake in a posthole at 1.5 meters depth in their garden! This can be a great project and will, in many cases, help to diminish the cultural noise detected by your Raspberry Shake.
Here is a step-by-step guide on how to install your Raspberry Shake in a posthole.
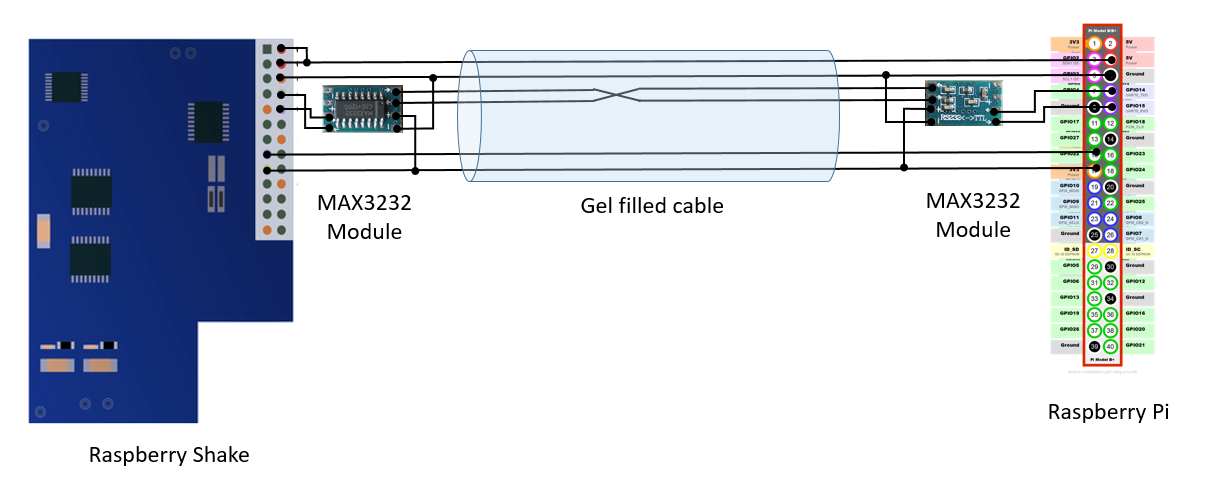
Overview: We will describe how to seal the geophone and Raspberry Shake board in a PVC pipe. This will require adding a MAX3232 module to convert the TTL signals to RS232 voltages for transmission to the Raspberry Pi which will live above ground (and which will similary have a MAX3232 module). Doing so will ensure that you can access the Raspberry Pi if the SD card fails or another problem presents itself after installation.
Step 0: The electronics:

Note
The MAX3232 are available cheaply on the internet (Ebay, for example). Sometimes the quality is a bit dodgy, so you might want to order a couple of extras. You could also use a MAX232 chip and some capacitors, but the modules are easier and cheaper.
Note
You want cable labelled “DIRECT BURIAL” gel-filled (type CAT5, CAT5e or CAT6 all work). This is what has the heavier jacket and is intended for outdoor use. It is more expensive and less flexible than standard Ethernet cable for indoor use (CAT5).
Step 1: Fix the geophone to the bottom of the house (on a PVC end cap). For instance, you can use a short length of 32mm PVC pipe to house the Raspberry Shake board and another endcap with a cable gland on it (for added waterproofing you might also epoxed this in).
Note
Epoxy glues mostly set brittle and do not adhere well to PVC. ‘Rubbery’ glues like Evostick or two part acrylics work well for sticking metal to PVC.
When you are done, things should look like this:
Step 2: Use a length of PVC pipe with a firm pressure fit over the top to place it in the hole and ensure the housing is vertical (using a spirit level, for instance).
Warning
It is important the geophone is installed as close to level as possible. Vertical geophones can be expected to work at angles of up to +/-30 degrees to the vertical. The problem lies in that you don’t really want to detect any horizontal signals to bleed into the vertical signal.
Step 3: Mix sand and concrete and drop it down the hole to fix the unit in place (yes, you are now resolved to never recovering it so take care that things are working before pouring the concrete!).
Note
A 50:50 sand and cement mix is recommended for seismic applications. Tamped down sand or soil usually works well.
Step 4: After the concrete has set, slip off the PVC pipe which was fitted just to the top of the unit.
Some important notes.
Note
You need to supply the Raspberry Shake board both 5V and 3.3V- this is usually done via snapping the board onto the Raspberry Pi computer’s header pins, but now those pins are at the surface of the whole.
Note
Here we recommend using inexpensive MAX3232 modules. They run on either 5 or 3.3V. However, we think you need to run on 3.3V to ensure the correct output level.
Note
Before you begin, run the Raspberry Shake on the surface for a few days and study the peak-to-peak counts so you see the baseline. Then you can compare this to the new baseline after you have installed your Raspberry Shake below ground in order to determine if there has been any improvement/ reducation in cultural noise.
Warning
There are always more than one way to skin a cat. Instead of using a serial cable as described above, for example, you could put the entire assembly in a sealed unit at the bottom of the hole and connect via a CAT5 Ethernet cable with POE. BUT, our experience tells us that you cannot accomplish the same thing by extending the geophone cable, even if shielded. This cable needs to be kept as short as possible. Lengthening the cable beyond the standard ~10 centimeters in length will introduce a LOT of Electromagnetic noise, swamping out any real signals like earthquakes!
Most importantly, have fun and enjoy!
And if you need help, visit the Raspberry Shake Technical Support Forum.! There are many Shakers out there who have tried this and are willing to lend you a hand.
Examples 2+: amateur seismic vaults#
Contributed by: Eddy @Malaysia
Please take a look at some of the blog posts written by your fellow “Shakers”:
Amateur Radio and My RF Shielded Raspberry Shake Vault Experiment by Shaker Andy Hansis in California.
My DIY Guide for a Home Raspberry Shake Vault by Shaker Steve Caron in California. Also by Steve:
Amateur Radio Enthusiast, Meteor Observer & Raspberry Shaker! by Shaker Jochen Richert in Switzerland. Also by Jochen:
A Muddy Adventure With Raspberry Shake by Shaker John Beale of Oregon. Also by John: